
ChinesePod and Anki
February 14th, 2013Note: this post has nothing to do with the usual photography/travel stuff I normally post about. Also, it’s rather long and technical so if you have no interest in creating Anki decks from your ChinesePod lessons just ignore this one.
So, I’ve been using ChinesePod.com for a little over a year now now to help me with my Chinese studies. It’s a great resource and while I have had a couple of issues with their mobile apps in the past I would definitely recommend them (if you’re studying Chinese that is; if not then you’re probably not interested in this post).
However, there are a few things I don’t like about the service and the main one is the inability to batch download the audio files for each lesson. I don’t just mean the 3 main audio files for the lesson/dialogue/review sections, but also each audio file for the individual sentences of the dialogue and expansion as well as the vocabulary. So many times I’ve been on the tube and wanted to hear a word or phrase only to be denied due to the lack of a data connection. In addition to that, it’s just slightly annoying to have to wait 4-5 seconds each time the app fetches the audio I want to hear.
I’m also not a big fan of their flash cards, especially compared to another app that I use every day to help with my studies: Anki. It’s a brilliant software that uses spaced-repetition to help with your learning, but it can be a bit unwieldy at times (a new version was just released, so that may just be me getting used to it).
Anyway, what I’ve wanted for a while was a way to export my current ChinesePod lessons (including the expansion sentences and vocabulary) into Anki decks. Ideally I’d have the English word or phrase on the front along with the Chinese characters that match the answer (I’m still in the early learning stages of the characters, so this might be considered cheating if you know more than I do). When the card is ‘flipped’ the audio plays and the pinyin complete with tone marks is displayed, along with the option to replay the audio.
Once I managed to get the info out of my ChinesePod app, this was all pretty easy. Here’s an example of what an exported ChinesePod lesson looks like as an Anki deck (in this case, the Vocabulary deck):

Here’s an example of what a single lesson looks like in my Anki deck
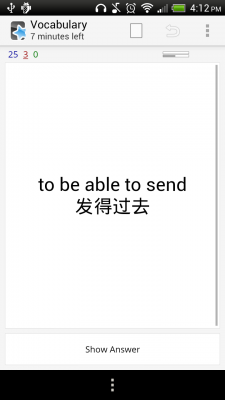
The front of the card.
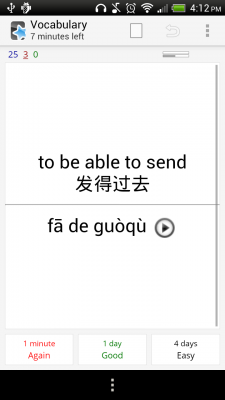
And the back of the card. The audio plays automatically when the card is flipped, and tapping the play button will repeat it as many times as you like.
So if that seems like something you’d be interested in doing, then read on. I’ve shared that particular deck on AnkiWeb if you’d like to check it out before diving in. You can find it here.
Another note: I think I’d rate the process as Intermediate in terms of technical know-how. This might be a bit much for your standard user, but I’ll try to detail things out as much as possible.
What you’ll need:
- An active subscription to ChinesePod. This isn’t about getting around having to pay ChinesePod for their service. For roughly $10/month (if you pay for a 2 year premium sub) it’s a great service and my intention is not to undermine what they’re doing. If you’re studying Chinese, I can’t think of a good reason why you wouldn’t want to subscribe. I have a premium subscription, but I think the basic one excludes some stuff that might make you unable to get all of the Anki decks listed like the vocab or expansions.
- The latest version of the phone app. As I’m writing this today, that’s version 3.2.3 for the Android folks. This may not work at all for iDevice folks, but I know this won’t work for version 2 of the Android app (the database is totally different). January 7th, 2014 Edit: I’ve upgraded to version 3.8.9 and this process still works. I had to make a couple of changes to the source once again, so you might want to re-download it all if you’re working from a previous download.
- A rooted/jailbroken phone. I can’t speak for certainty about needing to jailbreak your iDevice, but I assume that’s required in order to access the chinesepod database on your phone/tablet. I wasn’t able to access it on my unrooted Android tablet, but was fine with my rooted phone. This was the most difficult step for me as I hadn’t done this before, but there’s loads of sites out there to help with this stage.
- SQLite. As far as I can tell, this is the database used by chinesepod and we’ll need some way getting at the information store. You can download it free here. Drop the executable somewhere easy to find like C:\SQLite
- L/WAMP. This just stands for Linux/Windows, Apache, MySQL and PHP. This step could be done in many ways, but as I’m a PHP developer these are the tools I’m familiar with. “When the only tool you have is a hammer, every problem is a nail.” You can download a free, one click installer with WampServer. I haven’t used it before, but it seems like it will do the job (I typically use this one, but I can’t remember if MySQL is bundled with it).
- PHPMyAdmin. This is just a tool to help administer our database. You’ll want to drop it into wherever your webroot directory is (a quick search tells me that WampServer uses C:\wamp\www). There are some configuration changes you’ll need to make (user/password etc), but they’re pretty straight forward.
Once you have all of that sorted, simply follow these steps:
Copy the chinesepod database file to your computer*
On my phone, this file was located in /data/data/com.chinesepod/databases/ and the file we’re looking for is called chinesepod4. I had to copy this file to the sdcard on my phone and then plug the phone into the PC to copy it across. For ease of the next step, copy the file to C:\SQLite or wherever you placed your sqlite executable in step 2.
Extract the database*
I’m going to assume your sqlite.exe file is in C:\SQLite and your chinesepod4 file is in the same folder. Open a command prompt, browse to that directory and do the following:
You’ll end up with a text file called chinesepodExport.sql which we’ll need to manually edit now. I plan to create a little tool to parse this and import it directly in the future. I just went ahead and created a parsing script so we don’t need to mess with manually editing the export file.
Create the MySQL tables.
SQLite and MySQL don’t share the exact same syntax so the export we made earlier won’t just import as is (we’ll need to edit it in the next step. I’ll include a download link at the end that will have the SQL script to create the tables, but here is the code if you’d prefer to copy/paste. You’ll need to do this through PHPMyAdmin:
-- Database: `cpod`
--
-- --------------------------------------------------------
--
-- Table structure for table `android_metadata`
--
DROP TABLE IF EXISTS `android_metadata`;
CREATE TABLE IF NOT EXISTS `android_metadata` (
`locale` text
) ENGINE=InnoDB DEFAULT CHARSET=utf8;
-- --------------------------------------------------------
--
-- Table structure for table `api_cache`
--
DROP TABLE IF EXISTS `api_cache`;
CREATE TABLE IF NOT EXISTS `api_cache` (
`_id` INT(11) NOT NULL AUTO_INCREMENT,
`url` VARCHAR(255) NOT NULL,
`family` VARCHAR(255) DEFAULT NULL,
`response` mediumtext NOT NULL,
`date` datetime NOT NULL,
`maxage` INT(11) NOT NULL,
PRIMARY KEY (`_id`),
UNIQUE KEY `family` (`family`)
) ENGINE=InnoDB DEFAULT CHARSET=utf8 AUTO_INCREMENT=1 ;
-- --------------------------------------------------------
--
-- Table structure for table `media_file`
--
DROP TABLE IF EXISTS `media_file`;
CREATE TABLE IF NOT EXISTS `media_file` (
`_id` INT(11) NOT NULL AUTO_INCREMENT,
`v3_id` VARCHAR(255) NOT NULL,
`type` INT(11) NOT NULL,
`current_size` INT(11) NOT NULL DEFAULT '0',
`total_size` INT(11) NOT NULL,
`current_position` INT(11) NOT NULL DEFAULT '0',
`is_downloaded` INT(11) NOT NULL DEFAULT '0',
`download_id` INT(11) NOT NULL,
PRIMARY KEY (`_id`)
) ENGINE=InnoDB DEFAULT CHARSET=utf8 AUTO_INCREMENT=1 ;
As you can see, I created a database called cpod and just imported everything into it. To be honest we only really need the api_cache table for our purposes, but I didn’t feel like filtering out the inserts of the other two so I’ve just left them in. Also, I added in a unique field for the api_cache table which should prevent any duplicates if you’re trying to import some of the same lessons.
Copy the PHP files to your webroot
There are 3 php files that are included in the download below. They’re very simple and probably shouldn’t be used as a style guide, but they get the job done. You should see index.php, import.php and config.php, all three should go into the same directory.
Configure your settings
There are a couple of things you’ll need to change in the config.php file to make sure the scripts will run properly on your machine. Your database settings should be pretty close to what’s there already, though you may need to change the user/pass if you set up a default user. So that just leaves your download directories to set up; below is more or less what mine looks like.
The $ankiDir is the existing directory from your Anki installation (I’m assuming you have it installed). Just change this path so that it points to the Anki in your installation and you’re golden.
Browse to the PHP scripts
Once everything is configured you should be able to run the PHP files. Open your web browser of choice and type http://localhost into the address bar. ‘localhost’ basically tells your browser you want to load a page from your local webserver, so it should load our index.php file assuming you’ve placed it in the web root. You should see something like this:
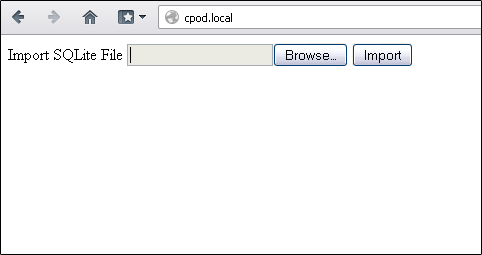
The default screen with our file import option (shown in FireFox)
If you’re seeing something similar, then well done! That was the tricky part, the rest is just importing your sql and then creating the Anki decks which is relatively straightforward in comparison.
Import the data from your App*
This step will move the data we extracted earlier from our app into the local databases. Click browse to find the file, which should be here if you’re using the same details as my example: C:\SQLite\chinesepodExport.sql and then just click Import.
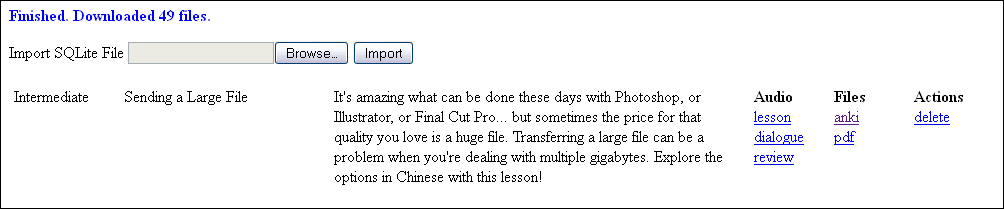
This should be a fairly quick process and you should see a success/fail message shortly. Hopefully you’ll end up with a screen similar to this:

Your screen should look something like this after you’ve imported your lessons from the app.
Create your Anki Decks*
I’ve left a few options to download the full audio files and the pdf if you’re into that kind of thing, but I don’t really use these outside of the app (and you can pull them down via RSS anyway, which is much easier). That leaves us with the anki link, which is what will generate our csv files that we can import into Anki. (note: it technically creates a semicolon separated file, but that’s too much of a mouthful to keep saying).
So, find the deck you want to import into Anki and click the corresponding anki link. This step may take a little while as the scripts are pulling down every audio file you’ll need at the same time as creating your csv file. Depending on your connection, it may take a minute or two to complete the process so just be patient. If it times out you can just run it again and it will pick up where it left off. Once it’s complete you should see this on your screen and the following image should be similar to what you see in your your csvImport folder:
An Anki deck that has successfully downloaded all of the audio files and created the csv files.
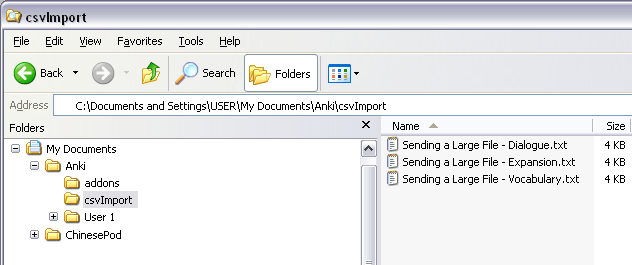
My local directory structure with the 3 Anki decks waiting to be imported.
You can import these directly into Anki as is, but I like to keep my ChinesePod decks separate from my other learning so these are the steps I take.
- Create a deck called ChinesePod and open that deck.
- Click File > Import
- Select one of the csv files to import. I’ll choose Dialogue as an example
- In the Anki Import window, click the below button to change the destination deck and then click Add in the window that opens up

Change our destination deck.
- Enter the following as your new deck name. This will create a ‘Sending a Large File’ deck under our ChinesePod deck and then a Dialogue deck underneath that:
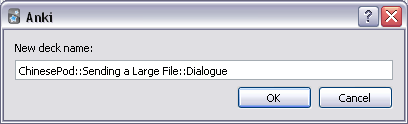
Anki uses :: as a deck separator.
- Make sure that ‘Allow HTML in fields’ is checked. You shouldn’t have to change the front/back/tags fields, so just click Import.
- Do the same for the Vocabulary and Expansion, and you’re done!
So, now what? Well, you’re going to have to go through a few these steps every time you want to add new lessons to your collection. I’ve marked the steps you’ll need to repeat each time you want to add new lessons with a handy *, but basically the process will be to copy the database out of your app, extract it using SQLite and finally importing that into the little system we’ve set up here. It may seem tedious but it’s still faster than trying to create these decks manually with all of the audio in place.
I should also quickly mention the delete option. Removing lessons from your App will have no effect on this list, so you’ll need to manually delete them here when you’re finished with them.
I realize there are a few gaping holes in these instructions, but I’m happy to answer any questions you might have in the comments below. I hope this helps out one or two folks out there until the folks at ChinesePod set things up so we can export directly from the website or app.
The files for this project are here: ankiExport.
This zip file should contain index.php, import.php, config.php and database.sql.
07/01/2014 Update: I’ve added a link at the top of the index page to Create Listening Decks. This will spin through all of your lessons and pull out all of the sentences from the expansion section of the lessons and creates Anki decks based on the lesson level. In my case I’ve ended up with 2 decks, one for Elementary and one for Intermediate. The front of the card is just the audio and the back includes pinyin, Chinese & English. If you have a lot of lessons you may need to run it a few times as it’ll likely timeout trying to download all of the audio files.

